Narvi User Guide
Installation
Narvi is open source software released under the MIT License and is installable as a Python package. For installation instructions and to view the source code, see https://codeberg.org/visual-topology/narvi.
Using Narvi
Narvi is a web application server written in python. It supports applications with two parts:
- a backend application service, written in python
- a frontend application, written in html/javascript/css
Narvi also provides:
- the concept of workspaces, separating groups of application service/applications
- service_ids, allowing different instances of an application service to be accessed
- session_ids, allowing a single instance of an application service to be accessed by multiple application instances
- messaging, allowing messages to be sent between application and application service instances
Narvi applications are available at end-points, typically:
http://host:port/narvi/workspace-name/application-name/service-id
or:
http://host:port/narvi/workspace-name/application-name
Narvi application services are available at end-points:
http://prefix/workspace/application-service-name/service-id/connect
Narvi does not implement authentication/authorisation support.
This should be provided by an external security layer which restricts access to the URLs.
Simple Example:
Project Layout
root/
    src/
        echo_app/
            __init__.py
            static/
                index.html
            echo_service.py
    run_server.py
All application and application service files are located within python packages, so your PYTHONPATH should include root/src
The application service (echo_service.py):
class EchoService:

    def __init__(self, services):
        self.services = services
        # route messages to the message handler method
        self.services.add_message_listener(lambda msg, sid: self.message_handler(msg, sid))

    def message_handler(self, msg, from_session_id):
        # send back a message echoing the received message...
        self.services.send("echo:" + msg, for_session_id = from_session_id)
Now the application (index.html):
<!DOCTYPE html>
<html lang="en">
<head>
<meta charset="UTF-8">
<title>Narvi Echo Example</title>
<script src="narvi/narvi.js"></script>
<script>
class EchoApp {
constructor(services, parameters) {
let message_content = document.getElementById("message_content");
let send_message = document.getElementById("send_message");
let recieved_message = document.getElementById("received_message");
services.add_message_listener(msg => {
recieved_message.innerText = msg;
});
send_message.addEventListener("click", evt => {
services.send(message_content.value);
});
}
}
window.addEventListener("load",(evt) => {
start_narvi(EchoApp);
})
</script>
<style>
* {
margin: 10px;
}
</style>
</head>
<body>
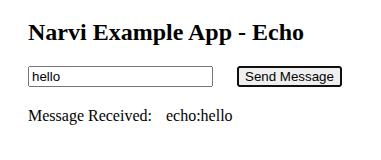
<h2>Narvi Example App - Echo</h2>
<input type="text" id="message_content" value="">
<input type="button" id="send_message" value="Send Message">
<div>Message Received: <span id="received_message"></span></div>
</body>
</html>
Create and run the service using the Narvi server API (run_server.py)
# script to run the Narvi Echo Service and Application

from narvi.api.narvi_server import NarviServer

server = NarviServer()

# register the backend service implemented by the EchoService app
app_service = server.register_service(workspace="workspace0",
     app_cls_name="echo_app.echo_service.EchoService",
     app_service_name="echo_service",
     fixed_service_id="echo_service_id", shared_service=True)

# register the frontend application which will connect to the service
server.register_app(application_service=app_service, app_name="echo_app",
    app_parameters={},
    resource_roots={
        "index.html": server.get_path_of_resource("echo_app.static", "index.html")
    })

# print the URLs for all applications
for service in server.list_app_urls():
    print(service)

server.run()
Something like the following output will be printed:
('workspace0', 'echo_app', 'http://localhost:8999/narvi/workspace0/echo_app/index.html')
Paste the URL into your browser to load the app